Daniel is a first year longitudinal foundation dentist qualified from Newcastle University in 2014 and is currently working between York hospital and general dental practice.
Introduction
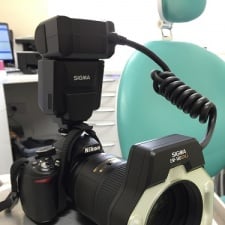
Whatever path your career may take, being able to take accurate photographic records is an increasingly important skill. This article will mainly consider the use of a DSLR (Digital Single-Lens Reflex) camera which will produce the best results when combined with a Macro lens and ring flash - think of it as an investment. The crystal clear images of treatment presented by lecturers and specialists does not come easy, unfortunately it can take years of practice and involves an in depth knowledge of photography.
Getting Started
If you stick to well-known brands for your camera body such as Nikon and Canon you will not be disappointed, there are also plenty of retailers who will sell you used camera bodies, lenses and flashes with that have been serviced and come with a guarantee. The best camera bodies to invest in are the middle range models such as Nikon's D7100 or Canon's 60D, an entry level body such as Nikon D3200 will produce similar results with the right lens. Macro lenses can get expensive; the top ones have a 1:1 ratio such as the 105mm Nikon lens. This means the image projected on your camera's sensor is up to exactly the same size as the real subject. Alternatively cheaper lenses and extension tubes can be combined. Ring flashes are ideal for macro photography as they provide a surplus of clean light on to your subject allowing you to optimise your cameras settings.
Understanding the settings
The most important factor to understand in order to take great photos is how to get the right amount of light into your lens and onto your camera's sensor. The main variables are shutter speed, aperture, ISO and lens/flash settings. Shutter speed is the amount of time the shutter stays open to allow light on to your sensor, generally speaking this should be set fast such as to avoid blur, especially for kids! Aperture is the control of your camera's iris and is sometimes called an F stop; a larger aperture will constrict the iris letting less light in however the depth of field will be increased. A smaller aperture will open up the iris letting more light in however the depth of field will be reduced. Most of the time you want maximum depth of field, this might change for full face and profile shots.
ISO is a way of adjusting your cameras sensitivity to light, it should remain as low as possible which is usually 100. An increase in ISO reduces the quality of your image creating what is known as 'noise'. Take a look at your iPhone shots from nights out and this will make perfect sense (low light and high ISO). Lens and flash settings will vary massively, with practice you will learn your own 'go to' settings to use for different shots. Consistency of camera settings will allow you to compare shades of teeth and communicate with a lab effectively; even your white balance setting should be taken off automatic to keep images comparable.
Taking the right shots
Its best practice to get in to the habit of taking a full set of records every time you photograph a patient, it may be time consuming but with practice it should take no longer than five minutes. By using the patient to retract their own lips the nurse can place the mirror allowing you to take the photo. Time can be saved by keeping the equipment set up and ready to go, nursing staff can also be trained to take photographic records when you are unable to. It is important to obtain valid consent from the patient and written consent is advisable.
Also consider shooting outside of dentistry, by practicing landscape or portrait photography you will be able to grasp different aspects of your camera. Be warned as it is easy to get carried away and spend a fortune on kit you might not actually need!
Conclusion

There are many different ways to develop your photography skills however there is no replacement for practice, the equipment may be expensive at first but it is an investment that should see you through your dental career. Once you master the key techniques you will develop your own personal style and configurations, by shooting in manual mode and using the same settings consistently records will be accurate and comparable.
Daniel Gillway
[email protected]